How to Make Watermelon Push Up Cakes
June 27, 2011 by ThePartyAnimal
Filed under Fun Treats
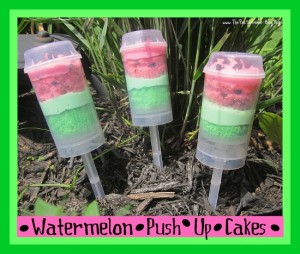
 Here is another fun Delicious Treat that is perfect for your next Party, Picnic or BBQ. These Watermelon Push Up Cakes are EASY to make, Taste Yummy and Look Great !!
I had my Niece and Nephew over for the weekend and wanted to make a fun treat for them and this is what I came up with. I cannot say it enough – I LOVE these Clear Push Up Containers and cannot get enough of them. These are not Watermelon Flavored at all – It is just White Cake Mix & Frosting colored to look like Watermelon with some Mini Chocolate Chips as the Seeds.
Funny thing is that this is my first time using these Push Up Containers for a Push Up Cake since I got them. I have been having so much fun using them for Frozen Treats & Jell-O that I thought I should try my hand at what they were originally being used as by many. Of course when I make anything it has to be Easy so that anyone one of you can do it too and these were, Trust Me.
Best Part – I photographed all the steps as I made them for the first time so you can recreate them too !! I know nice right? I think so.
So here is what I used to make these Watermelon Push Up Cakes:
- 1 Box White Cake Mix
- 1 Tub White Frosting
- Pink & Green Food Coloring
- Mini Chocolate Chips
- 12 Clear Push Up Containers
- Mini Cupcake Baking Pan
- Mini Cupcake Liners
-
12 Clear Push Up Containers

 So I gathered my ingredients and I started by mixing up the White Cake Mix as directed. Then I separated the batter into two bowls. I colored one a nice Green Color and the other a Deep Pink which I then added some Mini Chocolate Chips to (Watermelon Seeds♥).

 Then I lined my Mini Cupcake Pan with my liners and put spooned in my batter making 12 Green Cupcakes and 12 Pink Cupcakes. That would be enough for 12 Push Up Cakes. Note: I did have left over batter that I just used to create a few Large Cupcakes for the kids to snack on (ok I had one too), consider that a Bonus. The Photo shows the Cupcakes before Baking and After – Yum Yum Yum !!

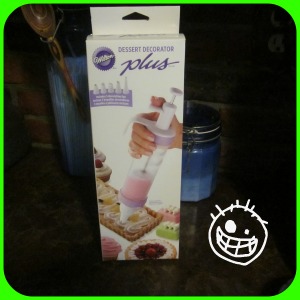
 Now I have to add that I had a new kitchen gadget that I bought at AC Moore a while ago (with my 40% off coupon of course) that I had been dying to try out. You do not need to have one of these for this, but I just had to try it. It is Wilton’s Dessert Decorator Plus
![]() – I am a sucker for anything that will make my life easier and this looked like it would. Honestly it reminded me of my husband Caulking Gun (lol). It comes with lots of tips and the Pump to make adding icing and doing any kind of Cake or Cupcake decorating easier than using the bags – I had to have it. Read on to see if I liked it or not….
– I am a sucker for anything that will make my life easier and this looked like it would. Honestly it reminded me of my husband Caulking Gun (lol). It comes with lots of tips and the Pump to make adding icing and doing any kind of Cake or Cupcake decorating easier than using the bags – I had to have it. Read on to see if I liked it or not….

 Next I took 1/2 the tub of White Frosting and colored it Green – I made the color a bit lighter than the cupcake since on a piece of Watermelon the rind gets lighter as you go up. Then I removed the liner from the Cupcake. I then carefully removed the rim around the cupcake that was a light brown and discarded (or ate). Then I had all my Push Up Containers on my make shift Shoe Box holder all lined up. I started by placing a Green Cupcake on the Bottom. Then I filled my new toy (Dessert Decorator) with the Green Icing and piped in a layer on top of my cupcake. It worked AWESOME !!! I love it. Of course if you do not have one you can do the Ziploc Bag method or just spoon it it and be careful not to get it all over the sides for a clean look.

 Next I removed the liners from the Pink Cupcakes and the rim as I did the Green Cupcakes above. I then placed one on top of the Green Frosting in the Push Up Container. Then I colored the remaining White Frosting Pink. I also added some more Mini Chocolate Chips to the Frosting too. Now I took that and added it into my Dessert Decorator and guess what? Even though my Mini Chocolate Chips were Mini and the hole on the end was bigger they still got stuck. I was able to work them out, but would not recommend doing that – Noted to self for next time. Once I added the Pink Frosting to the top of all the Cupcakes I then just sprinkled a few Chips on top of that and added the covers.
That is it !!! Easy and Adorable !!!

 Ready to Serve to the Kids !!!

 All 4 kids loved them – Hard to please them all with one item, but I did it !!! Wooo Hooo. I made 12 of these and a bunch of regular Cupcakes from the extra and there is only 2 left the next day. WoW. When my nephew was eating his 1st one I told him that they push up and he was like “Really?” so he pushed it up and right out – it was very funny (pictured above). Good thing the dogs were there waiting for something like that to happen, so they got a treat as well.
So give these Watermelon Push Up Cakes a try – you just saw how EASY they were to make !! Enjoy !!
Check out some of these Watermelon Party Supplies to go with these Push Up Cakes:


very cute!