Babycakes Cake Pop Maker Review – Does it really work?
April 2, 2011 by ThePartyAnimal
Filed under Fun Treats
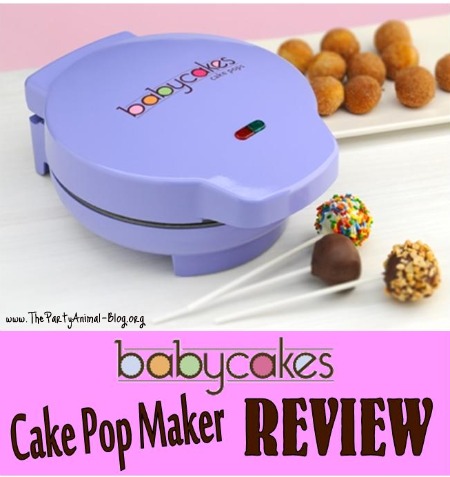 Have you ever wanted to make those fun Cake Pops you see everywhere, you know those little Cake Balls coated with Chocolate on a Stick? Maybe you are not sure how to get started. Well the Baby Cakes Cake Pop Maker
![]() was created to help you in making those Cake Pops, but does it really do what it says? I am going to give you my review and let you know right here as I use it for the first time.
was created to help you in making those Cake Pops, but does it really do what it says? I am going to give you my review and let you know right here as I use it for the first time.
Here’s my story… Being in the party business I have seen the trend of these Cake Pops explode over the years. It may have all started with the master, Bakererlla, who makes the most creative Cake Pops I have seen. But so many are now following in her footsteps and have mastered the technique. For me I have always wanted to give it a try, but never did until now.
 When I first saw the Baby Cakes Cake Pop Maker
![]() it was my in to try my hand at this trend – I am all about products that claim to make things easier ya know !! I knew I had to get my hand on one of these, so that is what I did. I actually went out yesterday and purchased one at Kohl’s. Lucky for me it was the last one on the shelf, like it was waiting for me. I also got an amazing deal – Normally it was priced at $29.99, but it was on sale for $19.99 and on top of that I got 10% Off and then another 15% Off of that with a scratch off discount at the register. So it ended up only costing me a bit over $15 Bucks – WoW, not bad at all. But will it work? Hmmmmm
it was my in to try my hand at this trend – I am all about products that claim to make things easier ya know !! I knew I had to get my hand on one of these, so that is what I did. I actually went out yesterday and purchased one at Kohl’s. Lucky for me it was the last one on the shelf, like it was waiting for me. I also got an amazing deal – Normally it was priced at $29.99, but it was on sale for $19.99 and on top of that I got 10% Off and then another 15% Off of that with a scratch off discount at the register. So it ended up only costing me a bit over $15 Bucks – WoW, not bad at all. But will it work? Hmmmmm
So after a long day of shopping with my Sista Peep I was tired, BUT I could not wait to try it out. I was dying to know if it worked and being my daughter was having a bunch of friends over the next night to watch the Nickelodeons’ Kid Choice Awards it was a great treat for them if I could pull it off. Now keep in mind I have never made Cake Pops EVER and I had never used the Babycakes Cake Pop Maker before either. I wanted to document it the first time I used it so you could all see the process for an honest review. With that said here we go…… Are you curious? If you have read this far I know you are.
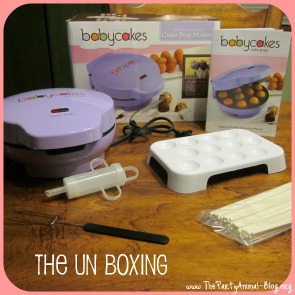 The Un Boxing – So here is everything out of the Box. The Cake Pop Maker – which is Purple (my favorite color ❤), Instruction Booklet which also contains some recipes, Cake Pop Cooling and Decorating Stand, Fork Tool, Cake Pop Sticks and Injector.
So I read the instructions with my Sista Peep and we were ready to go. I wanted to use one of the recipes from the book, but unfortunately I was out of butter – go figure. So I went into my baking stockade and grabbed a Box of Golden Yellow Cake Mix. So I was then good to go.
![]()
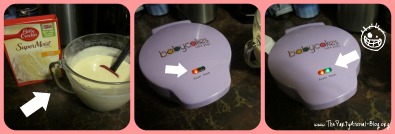 So I mixed up my Cake Batter and was ready to plug this baby in. So I plugged it in and waited for the Red Light to turn Green and say READY. It did not take long. Even though I was one eye open at this point from shopping all day I was ready to go.
![]()
 The instructions say to put approx 1 Tbsp of Batter into each space – so I actually took my Tbsp Measuring Spoon out for this. BUT I over added as you can see in the picture. I guess I had to get a feel for it, but that’s ok I closed the lid and could not wait to see if I would have little round Cake Balls when the time was up. The instructions say to give them 4-6 minutes to cook, but I gave them 4. The extra 2 minutes would have killed me, I am so impatient.
![]()
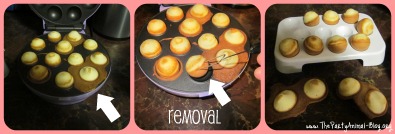 Upon opening of the Cake Pop Maker I had some Cake Balls – so exciting. Yes I also had some cooked spillage too, but that was ok. then I used the Fork and removed them carefully and placed them on my cooling rack. The ones with the extra edges I let cool down and then the edges peeled right off and my dogs loved the treats (lol). Being the pan is a non stick surface I had no issues with anything sticking to it and I was ready for the next batch to go in.
![]()
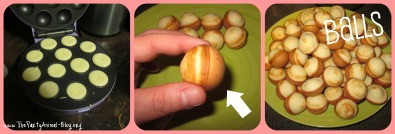 So my next batch was much cleaner, I was getting the hang of how much should really go in. You can also see the up close picture of the Cake Ball. The bottoms are a bit darker, but that is how they are suppose to be using this since the bottom cooks a bit more than the top. The majority of my Cake Balls were round with the exception of some that looked like Spaceships. That may just be from my use of the Cake Mix vs. the Batter recipes – not sure. When I try the recipes from the book I will update this to see if that is the case (Update added below).
The other thing when using the Cake Mix is that it makes A LOT of Cake Balls. I filled it 6 times – so 6 x 12 = 72 Cake Balls !! Holy Balls !! Not to worry I was so not making them all into Cake Pops at once. I decided to decorate 24 and freeze the rest for another time. I was tired and there was no way that was gonna happen. Now onto turning these Cake Balls into Cake Pops…
![]()
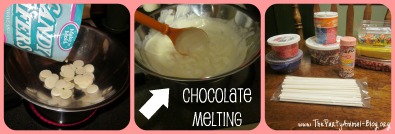 Originally I wanted to cover the Cake Balls with Milk Chocolate, but of course it turned out I was out of that too so I went with Vanilla Chocolate I had on hand. So I took my Vanilla Chocolate Wafers and melted them the old fashioned way by creating a double boiler on the stove. I then went into my baking stockade and gathered all kinds of sprinkles that would make them extra pretty. I was not getting Bakerella Fancy my first time around. Once the Chocolate was all melted then the fun began.
![]()
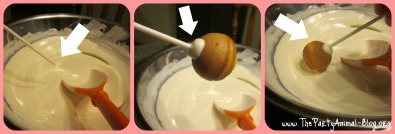 While I was melting my chocolate I placed my Cake Balls into the Freezer so they would be nice and cold for the next steps. So what I did to get started was first dip my Cake Pop Stick into the melted chocolate about 1 inch – this helps the Cake Ball to stick on better. Then I stuck it into my Cake Ball. Tip: After you do this you can stick them back into the freezer for a couple minutes to harden up so it stay on the stick better before dipping the whole Cake Ball. Did I do this? Nope, but I should have and next time I will.
So next you just take you Cake Ball on the stick and give it a bath in the Melted Chocolate to get all Covered. I did also use a spoon to help here as well. Carefully tap off some of the excess Chocolate, but be careful not to tap to hard – I had some casualties that fell off the sticks or broke through the top. I just took them and stuck them in the freezer to become Samples for the family, I will save the good ones for guests – hee hee.
![]()
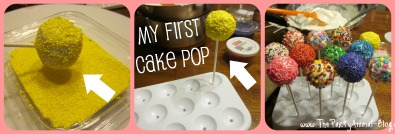 So after I dipped my Cake Balls into the melted Chocolate I then decorated each one with some of the many Sprinkles I had lined up. My first one was dipped and covered in Yellow Nonpareils – Yes my very First Cake Pop EVER – it was a little edible bite sized Ball of Sunshine on a stick that I was so very proud of. At that moment I felt officially part of the Cake Pop Makers Club, oh what a feeling… Of course my Cake Pops were no where near as fancy as some of the others out there, but I think they came out great for a first timer. Oh when you are done and have filled your Cake Pop Decorating Stand, which holds 12, Place into freezer for a few minutes to set up.
![]()
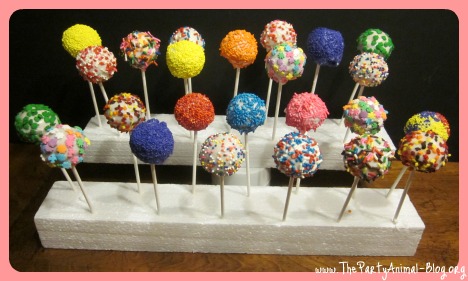 And here they are my first 24 Cake Pops !!
So in Conclusion, The Babycakes Cake Pop Maker WORKS as it said it would. Remember I am not being paid in anyway for my review but by getting to eat some delicious Cake Pops. I want to thank them for allowing me to be part of the Cake Pop Makers Club for I would have probably never attempted to make these anytime soon if it was not for this product. I have many ideas for treats using this and hope to share them in the near future. I am very happy with my New Kitchen Toy.
Did you know that Babycakes also makes other products too like their Babycakes Cupcake Maker, Babycakes Donut Maker & Bakecakes Whoopie Pie Maker? Maybe Babycakes will send me those to review for you “Hint Hint” lol.
Some extra Blah Blah Blah…
Things that made me say Hmmm. In the Babycakes Cake Pop Maker Instruction Booklet there was little mention on what to do with that Injector. I know it is for putting a filling inside of the Cake Balls, but there were no recipes or ideas. Did they forget to add them? Maybe an update is needed – I was curious and looking for some in there.
Also in the Instruction Booklet it says to be careful using metal on the Maker since it is made up of a Non Stick Surface (you do not want to scratch it), but the Fork they give to use to remove the Cake Pops is Metal. Maybe a Plastic one would have been a better idea?? Just Sayin’
Note to Self: Do not take on a First Time Project like this after a long day of shopping and so late in the evening. Sista Peeps says “Only bake with the Party Animal when she is not VERY tired”.
I know have a new found respect for those who make these Cake Pops all the time. They take some work, but end result is worth it.
![]()
 My Daughter loved them as did my Son and Hubby. I cannot wait to give them to all the girls tonight !!
If you are having a hard time finding one you will find a bunch for sale on Ebay here: Babycakes Cake Pop Maker
UPDATE:
So for Easter I decided to make some more Cake Pops, but instead of using a Boxed Cake Mix I tried one of the Recipes in the book that came with the maker. I made the Vanilla Cake Pop Recipe. So one of the things I wanted to see is that if I used the recipe would my Cake Pops be any different than the Cake Mix. The answer to that is YES. It was not a huge difference, BUT my Cake Pops seemed firmer and more dense and seemed to take the round shape a bit better. They tasted yummy and everyone seemed to like them.
I also made sure this time when I was ready for covering them in chocolate to dip the stick, add the Cake Pop and freeze to set before re-dipping and covering it. I did not have one causality this time around.
So my second time using the Cake Pop Maker was another success and I even got a bit creative making some into Bunnies for the kids:
 I am still loving my Cake Pop Maker and I am thinking what I will be creating next…..


What cake box mix did you use the first time ? I just bought Dunkin Hines & wondering if it’s worth trying it or if I should return it .
I am sorry I do not remember the brand – I am not sure it really matters though.
In your picture above, you used Betty Crockery cake mix!
Thanks for your review and tips. I am about ready to take mine back. I am disappointed in the texture. I am giving their mixes another chance. I am also going to buy a box of cake mix just in case. I made doughnut holes and they disintegrated in my mouth. It was almost chalky. Quite disgusting. I am making the white mix today. If those are gross, I will try a box mix. I am hoping something works!